How to become a better greenkeeper
As we start 2024, I want to help you get to grips with the actual condition of your green. This month, it’s going to be down to you to get your hands dirty to get familiar with your soil and turf (writes John Quinn).
Successful, economical and performance focussed greenkeeping is achieved by working with nature over the long term. Science comes into it to the extent that Science is simply the observation of nature. regular observation of what’s happening on, in, under and around your green, will make you a better greenkeeper and if things go wrong, you will have a much better understanding of what’s causing the problem. The more familiar you get with the ecology of your green, the easier and more successful your greenkeeping will become.
A simple routine
Your most valued and used tool should be your soil sampler.
By taking out soil profile samples regularly, you will get to know your green intimately and always have easy answers to previously seemingly difficult problems.
For example, the majority of drainage problems on bowling greens, aren’t actually drainage problems, but are caused by excessive thatch build up at the surface causing water to be held up.
Of course, if you stick a big spiking machine into a green where water is lying, the water will disappear. However, that might cost you hundreds of pounds and in most cases won’t solve the root cause of the problem. Meantime, by taking a soil profile sample out of the troubled area you will immediately be able to tell where the problem is. If the soil is saturated all the way through the profile, then perhaps you’ve got a drainage problem after all. However, what you’re much more likely to find is a soil profile that is friable and crumbly with a sponge of dense thatch sitting on top…squeeze the thatch and there’s your water problem; it can’t get past the thatch in order to drain down through the soil profile. Hundreds of pounds and untold damage to your green saved and you can now deal with the thatch with what you have to hand.
Step 1 – Find out what you’ve got
The best way I know of starting this is to have a look at what’s going on under the turf and you can get a good idea of this by taking a deep profile sample that will show you a cross-section through the green.
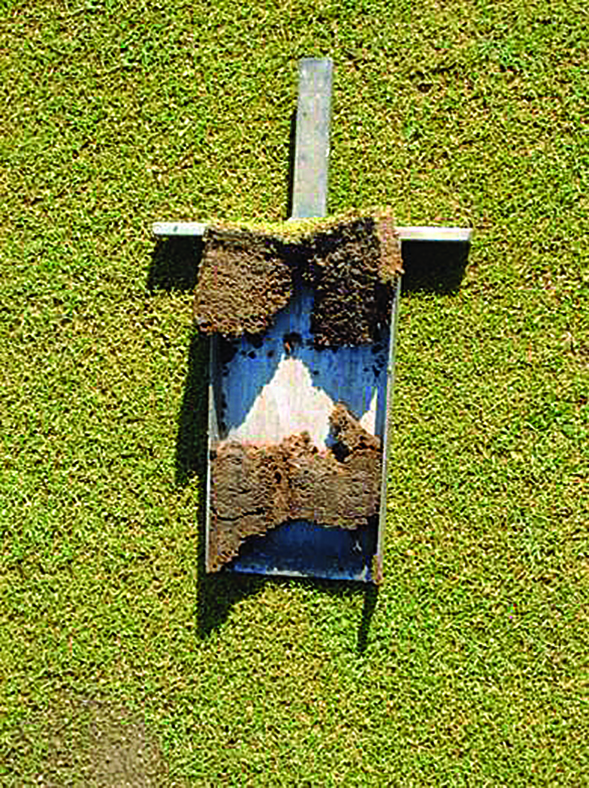
The best method is to use a sampler like the one in the photos, but a one inch (25mm) cylindrical core will do the same job. You are looking to establish the depth of the thatch layer, any distinct layers in the profile, any funny smells from it and how moist or dry it is. If you can get a deep sample (deeper than 150mm/six inch) you should be able to see the contrast between the natural soil the green was built with and the ‘improved horizon’ (top 100mm/four inch) where all of the top-dressing has been going over the years. You should also be able to detect any hard, compacted pans as you try to get the sampler in. Make a note of the depth of any noticeable hard layers.
In the photos, I’ve indicated with a yellow line where the thatch ends in this sample. This means that everything from immediately below the green grass down to the yellow line is thatch…more than 25mm (one inch) in this case which isn’t good news and needs attention. Incidentally you can see that this green has a fairly high proportion of yellowing annual meadow grass too…the two go hand in hand usually. Take several samples across the green and note down what you see with reference to the above points. If you can take a sample across the boundary of a normal area/brown area, you might be able to see a marked difference in the conditions below the turf. A sample taken from an are affected by Localised Dry Patch will typically fall apart as the soil will be powdery dry.
What did you find?
The majority of poorly performing greens can be classified as being at some stage on the Circle of Decline. This is due to the fact that every problem we find on greens is actually only a symptom of a very short list of potential underlying defects. By working on the root causes, we can quickly turn things around and start to make progress towards a consistently high performance bowling green.
Let’s have a look at some of the issues that crop up regularly and that you might have noted from your
own investigations.
The soil profile sample: First of all, assuming that you managed to get at least one nice slice out of your green. If the cost of a proper sampler is off putting, try speaking nicely to your local golf club greenkeeper, who might have an old hole cutter lying around un-used. This will give you a cylindrical profile sample that you can split down the middle with a knife. You should take a sample from any area that looks distinctly different and at least one from an area you would consider to be in good condition.
Soil texture and layers: Have a look at the soil profile to see if there are any distinct layers. The soil should ideally look like one homogenous mass without distinct layers of different materials. In most cases on bowling greens if you take a deep enough sample, you will see at least one distinct horizon (layer) change where the top 100-150mm is distinctly different in texture from the soil below. This marks what I’ve termed the improved horizon, which identifies the depth to which most of the regular maintenance has taken effect, especially aeration and top-dressing. This means that most greens will show a markedly sandier improved horizon than the soil below that level.
Root density and depth: You should be able to see (you might have to break the sample apart) evidence of root growth down through the profile. Root depth can be variable and although healthy turf will tend to have deeper roots, don’t worry if yours don’t go all the way to the bottom of the sample. You might see large masses of roots going down old core holes in your samples, proving that if we make it easier (by aerating to overcome compaction) for roots to get down, they will. Deeper roots make for a more resilient turf due to the plants’ ability to obtain moisture from deeper in the soil. However, root depth is directly correlated with leaf tissue mass, so it’s common for roots to recede upwards as the grass is mown shorter. Root mass is important too. The soil should be held together with a great mass of tiny grass roots and if you break the sample apart you should see a high percentage of fresh, white roots which indicates that the plants are growing vigorously and producing new root growth.
Thatch: So back to my obsession – thatch! The first thing you will notice is thatch, which is the dense mat at the top of the sample directly under the grass or at least the bit where the grass should be! Thatch is made up of dead and dying grass roots, shoots and leaf tissue. Some thatch is essential to allow the turf to stay knitted together in a cohesive unit, but too much is bad news. The optimum level of thatch is around 5-10mm and you should be concerned about it if is significantly more than this. A thick thatch layer shows that the natural processes that recycle organic material into humus and soil nutrients aren’t working at capacity. On bowling greens, this is commonly due to a lack of microbial life in the soil. The thatch layer might be dense, wet and smelly and if it is, you can probably squeeze excess moisture out of it. In this case, the green will be slow and unpredictable and susceptible to disease outbreaks. In dry weather, the same thatch layer can become hard and dry and impermeable to water, causing the green to be bumpy and difficult to keep grass cover.
Rootbreak: Related to everything we’ve discussed so far is a condition known as rootbreak. Rootbreak is identified by the sample falling apart at a particular horizon in the profile. This can happen due to compaction or layering of different materials in the soil. Essentially, it means that the roots have either stopped at a layer and have gone no deeper due to it being repellent (anaerobic or dry) or hard and impermeable. In a lot of cases where the thatch layer is thick, dense, wet and anaerobic, a
rootbreak will appear directly at the bottom of the thatch layer, meaning that all of the roots are existing
within the thatch. Rootbreak is common on greens that have been subjected to a variety of top-dressing materials over the years, or that have deep seated compaction leading to anaerobic (black) layers or that have built up a dense and anaerobic thatch layer.
Caption: Rootbreak is common on greens with excessive thatch or compaction
FOOTNOTE: If you have any questions please feel free to drop me a line at john@bowls-central.co.uk
Bowls International is the world’s most respected bowling magazine, available monthly in both digital and print formats.
- SUBSCRIBE to Bowls International
- Buy a PRINT COPY of Bowls International
- Buy a DIGITAL COPY of Bowls International
A six-month print subscription to Bowls International is priced at just £19.90, or a 12-month subscription is £35.99 – that’s less than £3 per month and includes FREE POSTAGE.